
#
Provision PHOENIQS Chat
This guide covers provisioning a dedicated PHOENIQS Chat instance for your company: its own URL, its own databases, and your own sign-on.
If your company already runs a chat instance and you only want to start using it, you do not need this page. Go to the Quick Start instead.
#
Prerequisites
Before you begin, make sure you have:
- An active Phoeniqs Console account with permission to make purchases
- A company profile associated with your account
Everything must be in the same resource group
Every subscription lives in a resource group, and the provisioning dropdowns only list products from the same resource group. A chat instance in Project A cannot use a Base LLM API in Project B.
Choose your resource group before you start and stay in it.
If you already have a fully provisioned Base LLM API in the resource group you want to use, skip to
#
Step 1: Purchase and provision a Base LLM API
PHOENIQS Chat runs on the Base LLM API. You need an active, fully provisioned Base LLM API in the same resource group before you can provision a chat instance. See Base LLM API for plans and pricing.
The MaaS Evaluation plan cannot run a PHOENIQS Chat instance
That plan is for testing the models directly through the API. When you provision a chat instance, the dropdown lists Base LLM API subscriptions only. If an Evaluation plan is all you have, there will be nothing to select.
Purchase a Base LLM API subscription, not an Evaluation plan.
- Sign in at https://console.phoeniqs.com.
- Open Products from the left navigation, or click Add Subscription from the Dashboard.
- Select AI Model Service, then choose Base LLM API.
- Click Add to cart, then Proceed to Checkout.
- Complete checkout and confirm your order.
For the general checkout flow, see Buy a Subscription.
Then provision it:
- Navigate to Resource Groups in the left-hand menu and open the resource group that will hold your chat instance.
- Expand the Subscriptions list and find your Base LLM API subscription with status Ordered.
- Click Provision Service on that row.
- Enter a subscription alias, a readable label you will see in later dropdowns, for example
MaaS-API-for-Finance-Team-Phoeniqs-Chat. - Click Provision.
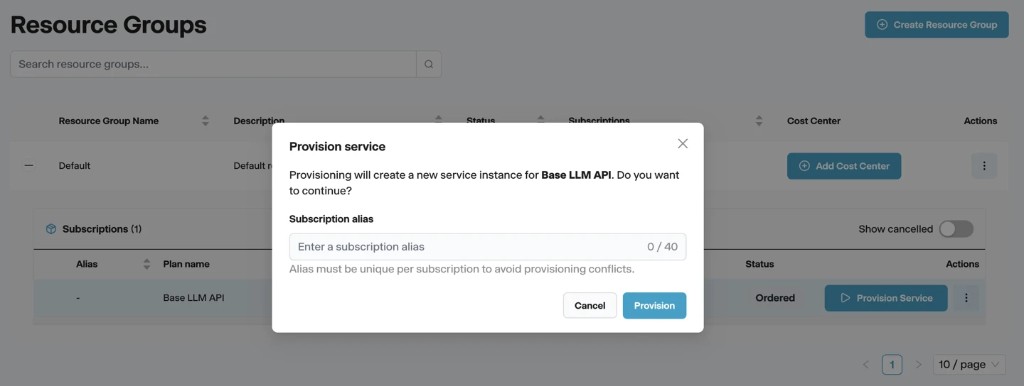
Provisioning takes a few seconds. Wait until the subscription shows as provisioned before moving on; an unfinished subscription does not appear in the chat provisioning dropdown.
You do not need to create an API key yourself. The platform creates one on this Base LLM API and attaches it when you provision the chat instance in Step 3. With one subscription you can create as many API keys as you want and re-create them at any time.
#
Step 2: Purchase the PHOENIQS Chat subscription
- Open Products from the left navigation, or click Add Subscription from the Dashboard.
- Select PHOENIQS AI Platform, then choose your PHOENIQS Chat plan. See Subscriptions for what each plan includes.
- Click Add to cart, then Proceed to Checkout.
- Complete checkout and confirm your order.
For the general checkout flow, see Buy a Subscription.
#
Step 3: Provision PHOENIQS Chat
- Navigate to Resource Groups in the left-hand menu and open the resource group holding your Base LLM API.
- Expand the Subscriptions list and find your PHOENIQS Chat subscription with status Ordered.
- Click Provision Service on that row.
- In the Provision service dialog:
- Enter a subscription alias, a readable label you will use to identify this instance later.
- Select a MaaS Instance, this is the Base LLM API from Step 1.
- Click Provision.
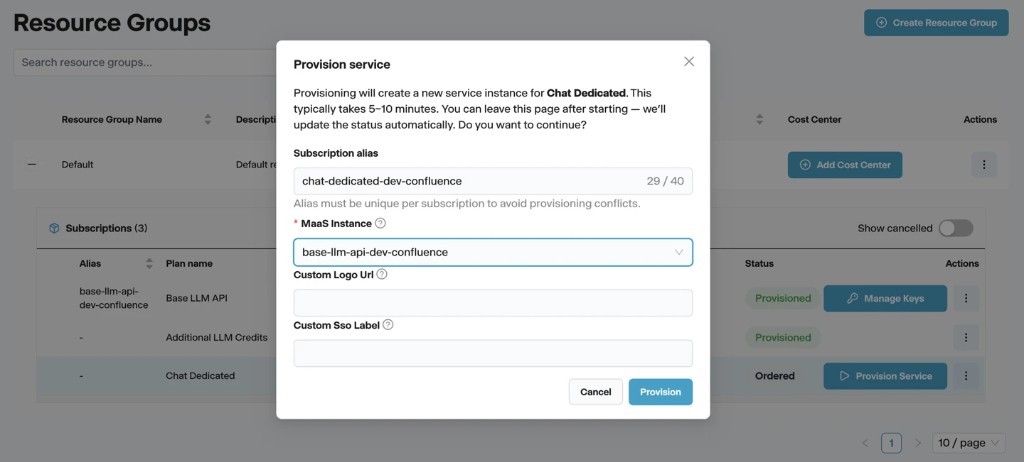
You never paste an API key
When you select a MaaS Instance, the platform creates a new API key on that Base LLM API, verifies that the key works, and attaches it to your chat instance automatically. There is no key to copy, and nothing to enter by hand.
Provisioning normally takes 5 to 10 minutes. Watch the subscription status in the console until it shows as provisioned.
#
Step 4: Open your instance
Once the subscription shows as provisioned, click Launch Product on the PHOENIQS Chat row.
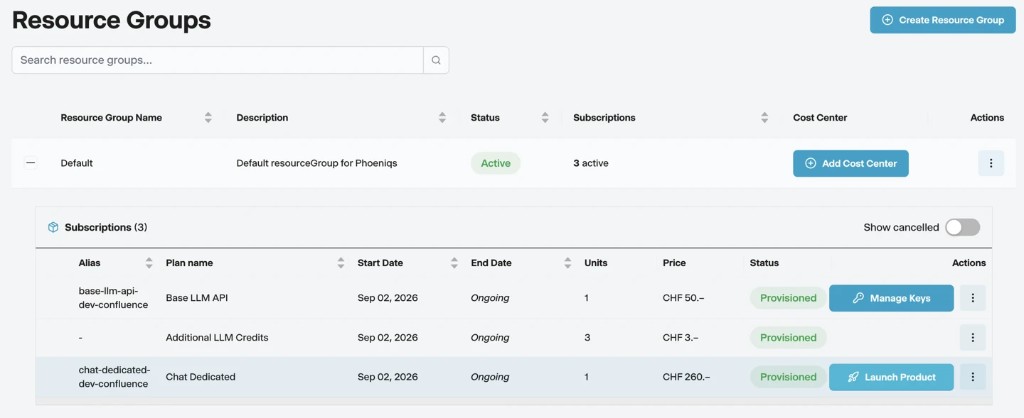
Your instance opens at its own URL and you sign in with your PHOENIQS account. Paid plans use enterprise SSO, so you sign in through your company identity provider rather than typing a password into the chat.
Sign in at least once before buying an assistant
Your chat user account is created the first time you sign in. A pre-built assistant purchased before you have ever signed in will not appear in your My Agents list.
#
What happens next
- Your chat instance draws inference from the credit pool of the Base LLM API you selected. All keys on that subscription share the same pool. See Base LLM API.
- To add users, share your instance URL with them. Access is controlled through your identity provider.
- To increase the credit allowance, see How to add LLM Credits.
#
If provisioning fails
#
Removing a chat instance
Removing a chat instance deletes its data
Conversations, uploaded files and knowledge bases in that instance are destroyed and cannot be recovered. Export anything you need first.
A chat instance cannot be removed while pre-built assistants are still installed on it. Remove the assistants first, then the chat instance.
Removing a chat instance does not remove the API key it created on your Base LLM API. That key stays on the Base LLM API subscription and should be deleted separately if you no longer need it.
For the cancellation procedure, see How to cancel a subscription.
#
See also